I am not a licensed contractor, nor am I telling anyone how to do this, just sharing my experience - whether it's the right way or wrong way, I'm just a woman with a desire and short on cash
SO, as my Dad used to say, 'If you think you can, or you think you can't - your right'...

I have 3 prybars, papa bear, mama bear & baby bear, thats all you need, for now!
Just so you know, if you take the paneling down, it's trash! It's glued and stapled, and the glue strips the back of it. Doesn't matter how careful you try to be..

In this photo, I had just begun deconstruction. The tv was built into the wall and framed out. Below it was a built-in book/display case. The opening on the right is the hallway. At this point, the frame around tv & display case has been removed. (right of the tv is a partial section of a lobster trap I found on the beach).

Here the tv has been removed. At the top of the wall, you can see a dark strip. That is where I've already taken the trim off. Above tv on the ceiling is the remnants of a wood stove chimney, that also will be removed.

This view is from the spare room/laundry room looking out towards living room & kitchen. To the left of the hole the tv was removed from, that grey box is the furnace. The wire hanging is connected to the furnace.
That wire that is hanging in above pic comes from the electric panel, to the this strange looking connection box (below left), then two wires comes out of this box, one to power the furnace, the other to this emergency shut-off switch (below right) by the door (it has been cut out of paneling because that panel will also be removed).
 |
 |
Well, on with the show...

The wall between the living room and laundry room has been removed, and that's the furnace on the right. The wall studs are 2x2's. The floor is continuous. The way a mobile home is made is that the floor is laid down, then walls set on top. Here is a really good diagram .
One thing you will find is that the insulation in a mobile home (MH) is about 1 inch thick (about R-0) lol. I bought used 1 1/2 inch, used 4'x8' sheets of polyiso insulation. I completely covered the outside of my MH with the sheets of this insulation. But thats for another post (stay tuned for that).

The black spots on insulation is just dust, not mold. Usually when you see that, it means air leakage!

On the other side of this wall is the bathroom. The ceiling was easy to take down, just messy - make sure you wear safety glasses and a mask. The structure of the roof as you can see, is trusses. The ceiling panels run the width, from one side to the other. The material is a press-board, and is stapled along each truss. It came down in fairly large sections, and it was pretty lightweight. There was plastic sheeting/vapor barrier holding the insulation in the ceiling, which made it easier to take insulation down, bay by bay.

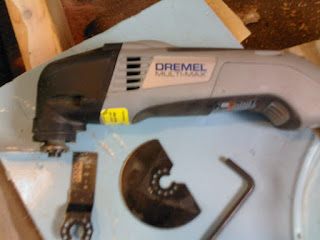
One more thing, when you pull the ceiling down, the panels are under the trusses and on top of the outside wall top plate, so they break off along the edge. And not clean, but sticking out. I knew I had to cut them flush, so the drywall would set flat. What to do? The only way I could think of to cut it flush, is with the awesome tool my neice got me last year.

The Dremel Multi-Max. It has saved me from so many potentially frustrating situations, that I don't know what I would do with-out it! I just absolutely love it! It oscillates rather then spins. The wood blades are fairly reasonably priced, but the blades that are labeled wood/metal are a little more pricey. And if ya hit a nail or staple with the wood blades, it pretty much ruins them. But this tool cuts that press-board like butter..
Original article and pictures take mobilehomeremodeling.blogspot.com site
Комментариев нет:
Отправить комментарий