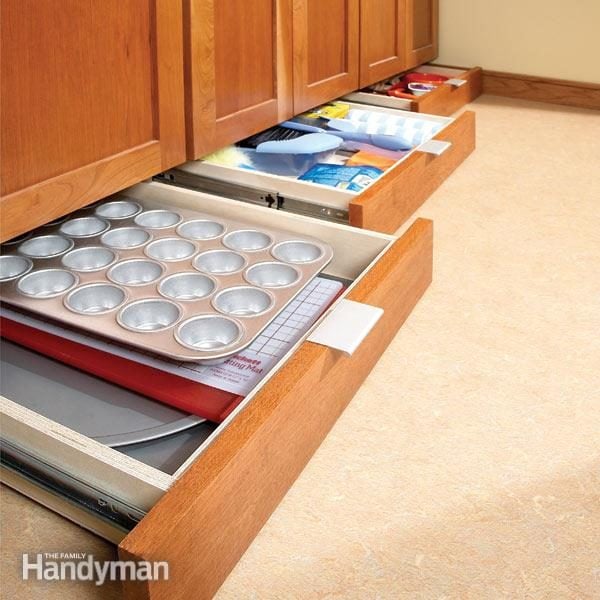
Overview
Don't let all this space go to waste
To gain storage space, you usually have to give up space somewhere else. Not in this case. Hidden under almost every kitchen cabinet, there's a cavity containing nothing but air. This low, shallow cavity isn't prime storage space for everyday items, but it's perfect for bakeware, cleaning supplies, pet dishes and more.
Installing below-cabinet drawers sounds like a tough job, requiring fussy planning, the skills of a cabinetmaker and child-size hands to work in that cramped space. But this project is amazingly easy. To simplify the whole process, we designed self-contained drawer units that you can assemble in your shop and then slip into place. To simplify planning, we'll show you three basic measurements that let you size these drawers to fit under any cabinet. Even if you've never built or installed a drawer before, you can do it. This project is economical, too—you can build the drawers for a fraction of the price a cabinetmaker would charge. The number of drawers is up to you; install them under all your cabinets or just one.
Will it work with my cabinets?
The vast majority of kitchen cabinets are similar to the ones we show here, with sides that extend to the floor (see Photo 1). But there are a few rare exceptions. Some cabinets, for example, stand on legs rather than the cabinet sides. Open the cabinet doors and take a look at the bottom of the cabinet box. If you see screw heads or holes near the corners, your cabinets probably stand on legs rather than the cabinet sides (the screws or holes allow for height adjustment). In that case, installing drawers will require different steps than we show here.
If your cabinets are constructed like ours, you can install drawers just as we did. There are just a few things to keep in mind:
- If the cabinet is more than 30 in. wide, consider installing two drawers rather than one. Wider drawers tend to bind as you slide them in or out.
- Your drawers will be shallow; don't expect to store kettles in them. A 4-in.-high toe space will give you storage space that's about 3 in. deep.
- You can install drawers under a sink cabinet (or a bathroom vanity). But if the sink's plumbing runs through the bottom of the cabinet, the drawers will have to be shorter.
The drawer, cradle and slides form a complete unit that's simple to build and easy to install under a cabinet.
Tools and materials
You could build the drawers with nothing but hand tools and a circular saw, but a table saw and miter saw will give you faster, better results. A nail gun is another big time-saver, though you can hammer everything together with 1-1/4-in. finish nails instead.
All the materials are available at most home centers. In the hardware aisle, choose “full-extension” side-mount drawer slides (see Photo 3). That way, only 3 to 5 in. of the opened drawer will be covered by the overhanging cabinet front. With cheaper “3/4-extension” slides, only about half the drawer will be accessible. If you can't find full-extension slides, or if you want “overtravel” slides that extend even farther, shop the Web. Search for “drawer slides” to find online suppliers. Slides are available in 2-in.-length increments. Most cabinets accept 18- or 20-in. slides.
Choose hardwood plywood like birch or oak for your drawers. Construction-grade tends to warp. Most home centers carry plywood in 2 x 4-ft. and/or 4 x 4-ft. sheets, so you don't have to buy a full 4 x 8 sheet. Pick out straight pine 1x4s for the cradle sides. For the drawer faces, you'll need hardwood that matches your cabinets. If your toe-space height is 4 in. or less, a 1×4 board will do. For a taller toe space, you'll need a 1×6. Most home centers carry only a few types of wood such as oak, cherry, and birch or maple. If your cabinets are made from a less common species, look for a lumberyard that carries a wider selection (check online or in the yellow pages under “Hardwood”). Or improvise—with the right stain, you can make birch or maple approximately match the color of just about any wood. The grain may look different, but that difference usually isn't noticeable in the dark toe space. We used maple faces, even though our cabinets are made from cherry.
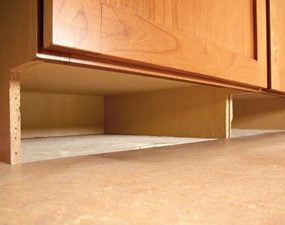
Remove the toe-kick and measure

Photo 1: Remove the toe kick
Break out the toe-kick backing to open up the spaces under the cabinets. Just drill a hole near the center, cut the backing in half and pull it out.
Before you buy materials, open up the cavity under the cabinets so you can take measurements. First, pull off the “toe-kick,” the strip of plywood or particleboard in the toe space. Usually, the toe-kick is held by just a few small nails and is easy to pry off. If you don't plan to cover the entire toe space with drawers, be gentle so you can later cut the toe-kick to length and reinstall a section. If layers of flooring have been added since the cabinets were installed, you'll have to pull the top edge of the toe-kick outward first and then pry it up to clear the built-up floor.
Next, remove the toe-kick backing under the cabinets (Photo 1). Simply drill a 1-in. hole and cut the backing with a drywall saw. Then grab a flashlight and check for obstructions. Break out any blocking with a chisel or pry bar. Pull out or cut off any nails. Now you're ready to take the three measurements to determine the sizes of the drawers. There's no need for complex calculations—it's all reduced to simple subtraction in Figure B.
Figure B: Drawer Sizing Simplified
Measurement “A”
- Subtract 1-1/2 in. from “A” to determine the width of drawer sides, front and back.
- Subtract 1/2 in. from “A” to determine the width of drawer faces. The length of each face depends on the width of the cabinet.
Measurement “B”
- Subtract 3-3/4 in. from “B” to determine the length of the drawer front and back. This will make the entire drawer/cradle assembly 1/4 in. smaller than the width of the cavity.
Measurement “C”
- Subtract 1/4 in. from “C” to determine the length of the cradle and drawer sides.
- This is also the maximum length of the drawer slides you can use.
Build drawers and cradles
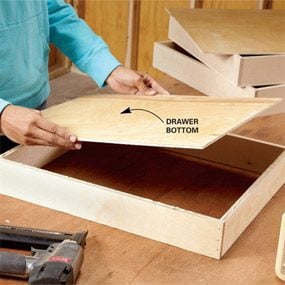
Photo 2: Build the boxes
Build super-simple drawer boxes. Just glue and nail the sides, front and back together, then glue and nail on the plywood bottom.
If you've ever installed drawer slides similar to the ones we used, you already know how fussy they are. They require a precise 1/2-in. space on both sides of the drawer—build a drawer that's a hair too wide or narrow and you've got a drawer that won't budge. To sidestep that precision work, build each drawer first and then build a “cradle” around it. If you want to install two drawers under one wide cabinet, build a single cradle with both drawers sharing one of the cradle sides and the cradle base.
Our drawers are as easy as they get: Just nail them together (Photo 2). If you're using finish nails rather than a nail gun, predrill so you don't split the plywood parts. Remember to place the front and back between the sides. Then measure and cut the drawer bottoms. As you install each bottom, be sure the drawer box is square using a large carpenter's square or by using the plywood bottom as a guide (this only works if you've cut the bottoms perfectly square). Cut the 1×4 cradle sides to the same length as the drawer sides. In most cases, you can use 1x4s at full width (3-1/2 in.). But if your toe-space height (measurement “A” in Figure B) is less than 4 in., cut the cradle sides to a width 1/2 in. less than the toe-space height.
Next, mark screw lines on the drawer and cradle sides (see Figure A for measurements). Pull each slide apart to separate the drawer member from the cabinet member. Then screw them on (Photo 3). Our drawer and cradle sides were the same length as the drawer slides—yours may not be. So be sure to position the front ends of each drawer member and cabinet member flush with the fronts of the drawer and cradle sides. Slip the slides back together, lay the drawer upside down and screw on the cradle base (Photo 4). Then flip the whole unit over and inspect your work. Make sure the drawer opens smoothly. When the drawer is closed, the front of it should be flush with the cradle sides, give or take 1/16 in. Any problems are easy to fix by removing screws and repositioning the slides.
Note: With our drawer units assembled, the cradle sides are exactly the same height as the drawers. Your drawers may come out a bit higher or lower.
Install the drawers

Photo 5: Attach the cradle
Slip the cradle under the cabinet and drive screws through the cradle sides just below the slides. Small hands and a small drill make this part easier.
Before you remove the drawers from their cradles, number them to avoid mix-ups later. Each drawer will slide smoothest in the cradle that was built for it. Slip each cradle into place and fasten it to the cabinet with four 1-5/8- in. screws. If you have flooring that's more than 1/4 in. thick, first set scraps of 1/4- or 1/2-in. plywood under the cabinet to support the cradle. The cradle base can be higher than or flush with the flooring, but not lower than the flooring. Position the cradle sides flush with the cabinet sides and tight against one side (Photo 5). Screw the cradle to the cabinet, starting with the tight side. On the other side, don't drive in the screws so hard that you distort the cradle. If the drawer doesn't glide smoothly, slightly loosen those screws. Also be sure the drawer doesn't drag on the floor when opened. Load a few heavy objects into the drawer and open it. If it drags, remove the front screws from the cradle and slip washers under it. That will give the drawer a slight upward tilt to clear the floor.
Next, cut the drawer faces to width. When you cut them to length, avoid measuring mistakes by marking them while they're in place. Leave a 1/8- to 1/4-in. gap between neighboring faces. At the end of a row of cabinets, make the face flush with the outer side of the cabinet. The method we used to attach the faces works best with a nail gun (Photo 6). Driving nails with a hammer can knock the drawer or cradle out of position. If you don't have a nail gun, stick the faces in place with double-face carpet tape. Then pull out each drawer and attach the face by driving two 1-in. screws from inside the drawer. With the faces attached, be sure they don't drag on the floor. If necessary, raise them with washers as described above.
Finishing up
Remove the drawers from their cradles for finishing. Unscrew the slides from the drawers and sand the drawer faces with 120-grit sandpaper. Also prepare a few stain-testing blocks, using leftover scraps from the faces and sanding them. We removed one cabinet door and took it to a paint store to have matching stain custom-mixed. If you have the patience to experiment, you could buy a couple of cans of stain and mix them to create your own. Either way, apply the stain to your test blocks before you stain the faces. The match doesn't have to be perfect, since the faces will be shaded by the overhanging cabinet fronts. After staining the faces, we finished our drawers—faces and boxes—with two coats of waterbased polyurethane. Before reinstalling the drawers, add the drawer pulls or knobs. We couldn't find pulls that closely matched our existing cabinet hardware, so we chose pulls that fit over the tops of the drawer faces and are hidden under the cabinets (see first photo).
Required Tools for this Project
Have the necessary tools for this DIY project lined up before you start—you’ll save time and frustration.
- 4-in-1 screwdriver
- Air compressor
- Air hose
- Brad nail gun
- Clamps
- Cordless drill
- Drill bit set
- Framing square
- Miter saw
- Paintbrush
- Reciprocating saw
- Safety glasses
- Self-centering drill bit
- Table saw
- Tape measure
You can use a keyhole saw instead of a reciprocating saw and a circular saw instead of a table saw.
Required Materials for this Project
Avoid last-minute shopping trips by having all your materials ready ahead of time. Here’s a list.
- 1-1/4“ brads or nails, 1“ and 1-5/8“ screws.
- 12' of 1x4 pine
- 3 pairs of drawer slides
- 6' of 1x6 maple
- Drawer pulls
- One 2' x 4' sheet of 1/2“ birch plywood
- One 4' x 8' sheet of 1/4“ birch plywood
- Polyurethane
- Stain
- wood glue
Here's what we used to build drawers to fit under three 24-in.-wide cabinets. Your quantities may differ.
Original article and pictures take www.familyhandyman.com site
Комментариев нет:
Отправить комментарий