I am so thrilled that almost everyone has loved my kitchen reveal. It has been so great to come down the stairs every morning and get to make my iced coffee in such a great space. I have been fielding a lot of questions about how I did it, and what my cabinet painting technique is. So today I am not only going to show you how I did it, but I am also going to explain how I was able to get through about 10 days of kitchen "renovation" without losing any functionality or my mind.

Edited to add (Summer 2015): I actually did a follow up post of 100+ additional cabinet painting tutorials if you are looking for additional options.. although I still stand behind this original tutorial. For me it is the BEST way to paint cabinets. I am still thrilled with the result three years later.

First up, a few quick "before" shots so you can actually grasp just how many kitchen cabinets I have. It is a LOT:


The first thing I did was remove all the doors (don't remove and empty the drawers yet at this point.. ) Stack the doors up and save them for later but leave the drawers in the cabinets!
I know a lot of people label every door and drawer so they can figure out where they go back. I didn't bother to do that. There was enough variation in the sizes of my doors (and the fact my mounting hardware was standard) I knew they would only go back a certain way.

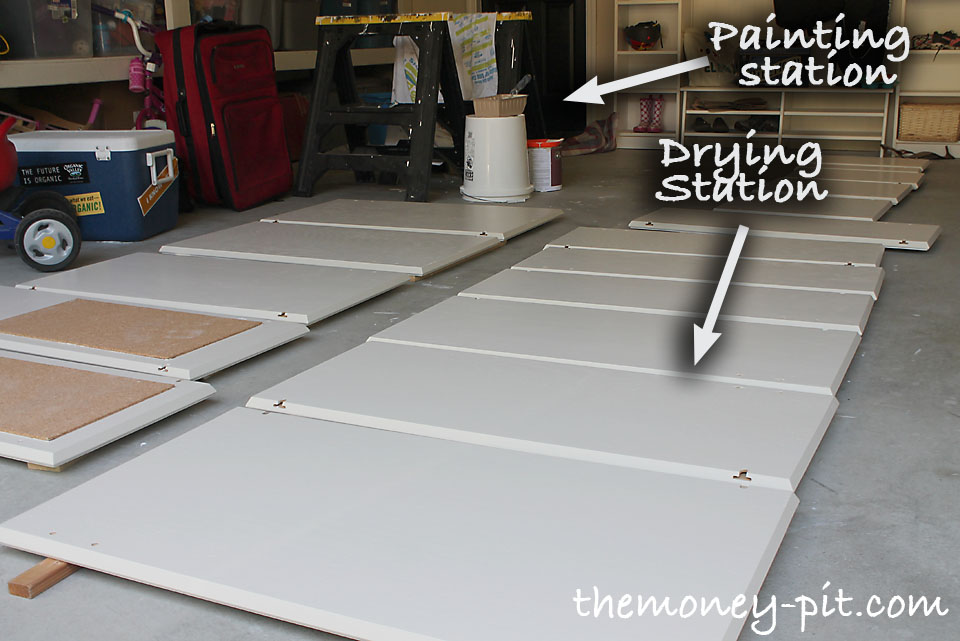
When all was said and done, I had to sand, prime and paint THIRTY NINE door and drawer fronts. (This doesn't include four in the island I previously stained, or the two I removed to create open shelving.)
That is a lot! However, I wasn't even dealing with the doors/drawers at this point. You can live in a kitchen without door fronts, you have bigger fish to fry right now.

Yes, this is messy, but I still didn't bother to empty my cabinets. I would rather run my plates through the dishwasher than deal with moving them out and putting them back. I wanted the kitchen to stay FUNCTIONAL and I wanted all my junk right where it belonged.
To sand the boxes, I did pull the full drawers out and set them on the counter, but I didn't bother emptying them. To keep the contents clean you can cover them with a drop cloth, but you still should have access to all your utensils and drawer contents during the first stage of this project.

Yes, it seems strange to have "clean up" in the middle of the process, but the sanding is the only truly messy part of the process. You want to set up a separate space to sand, prime and paint your doors and drawers, so at this point you can clean up your kitchen of the dust (this is good to so you don't get dust into your fresh paint.) Also make sure you wipe down your sanded cabinet boxes to get rid of the dust.

Yes! These are the best things ever. They work as well as TSP and act as a tack cloth all at once. (I NEVER recommend using TSP in lieu of sanding and wiping down with a tack cloth or wipe) Wipes also cut the grease and grime, they are disposable and they dry almost instantly. I swear they should label them "Paint Prep Wipes" and market them! After sanding, just wipe everything down with a Clorox wipe (I use approximately one wipe per cabinet) and you are ready for the next stage:

I was going to use Benjamin Moore Regal Select paint (in Pearl finish) which contains primer already, and I was assured by the BM salesman that I didn't need to prime, but I don't care. Call me old school.. if I was going to do this much work, I was going to make sure it stood the test of time. I used Killz Latex primer and a sponge roller. I did two thin layers (by the time I got all the cabinets done, the starting ones were dry so I could easily go back.) For the corners or any trim work I did use a good quality brush (I personally like this Purdy type), but I always went back and got rid of brush marks with the roller (I like the small ones with no nap).


At this point, your kitchen is "good to go." I honestly rushed through those first stages because I knew once the boxes were done, I could take my time on the rest of it. If you never got around to painting the doors or drawers, you can still use your kitchen. That is the key to this painting strategy.
When you are ready to move on (since you may want a break at this point) take the contents of your drawers and set it on your newly cleaned countertops. This is going to be a slightly more disruptive stage than the others, since you will have to dig through the loose contents of your drawers, but it will go quick I promise.
This step (exactly the same technique I used on the boxes) went pretty quick, since the drawers have such little surface area. I set up an area in the garage to do this so my mess was contained. Once they are painted and dry, return them to the kitchen and fill them back up. Your project is almost complete! You just have to live with "Open Concept Cabinetry" for now!
I'm not going to sugar coat it. This is the absolute WORST part of this whole project. It takes forever, and you will be so sick of looking at doors you will swear off painting forever. Just hang in there!
The way I dealt with this many doors is to set up an assembly line. I lined all the doors up on blocks to keep them off the floor. I also set up sawhorses and a bucket to hold the doors and my paint tray up (since I didn't want to have to lean over.. I was going to be there a while)
The reason this matters is that when you flip the slightly damp doors over, you risk nicking the paint job. I would rather have the paint on the FRONT of the door to be perfect, so always start with the back side of the doors. The overnight dry time between flipping helped prevent any sort of chipping/marking.
Also, don't forget about your hardware at this point. If you are reusing it you want to make sure you spray paint it at this point.

I have had a few questions about the cabinet color. Most people think they are painted white, but that isn't true. They are TAN.. and pretty dark tan at that. It doesn't look like it in my dark kitchen, but when you see the difference between the primer and the paint, it is very apparent:


In case you are curious how long it took exactly, the breakdown of the timeline was like this:
Without doors on the cabinets, I had to stare at this scene for days on end:


I recently removed Disqus comments and converted to the Facebook commenting system.
Thank you for your understanding.
Original article and pictures take www.thekimsixfix.com site
Комментариев нет:
Отправить комментарий